
Over time our homes and creative spaces may become a little stagnant or accumulate negative energies as people and situations come and go. In addition to clearing space and energy in your home, it is always a wonderful experience to smudge yourself too!
Smudge sticks or smudging wands have been used for many centuries to clear spaces from these unwanted energies and purify the air. It is recommended that you smudge your space at least twice a year and when you moved into into a new home. I have been using sage incense for many years now to cleanse space before I paint, so using a smudge stick is a natural progression. There isn’t a limit to how often you perform your smudging ceremony and I love to do this every time i start a new project (which is often!)
Its a wonderful way to feel like any negative energy is cleared away and that the air is full of positive, cleansing energy for the new beginning you would like to bring into the space.

Here is just one of the ways you can create your own smudge stick from herbs in your own garden as part of your clearing, cleansing and space clearing ritual.
What you will need:
- Bunch of lovely herbs (traditionally white sage is used, but you can also add lavender, rosemary, mugwort, juniper)
- string/cotton/hemp chord.
- Scissors
STEP 1: Pick a few bunches of herbs in your garden about 5 – 8 inches long. It’s okay if they are all different sizes!

(left = sage, middle = lavender, right = rosemary)
STEP TWO: Gather all the herbs, so that the cut ends are all together and the leaves facing in the same direction. Tie around the bottom to secure them all in place.
I used hemp cord here

STEP THREE: Start to wrap the chord around the herbs, making sure that the leaves are all pointing in the same direction and flattened as you move along.
STEP FOUR: Gradually, work your way along the length of the bunch and pull the chord a little tighter so everything is more secure as you move up “cris crossing” the chord.
|
|
|


STEP FIVE: When you get to the top, simply secure the rest of the chord around the herb bunch.

Place the bundle outside or hang it up to dry. Traditionally this was hung in the kitchen area. It may take a couple of days or as long as a week to dry out.
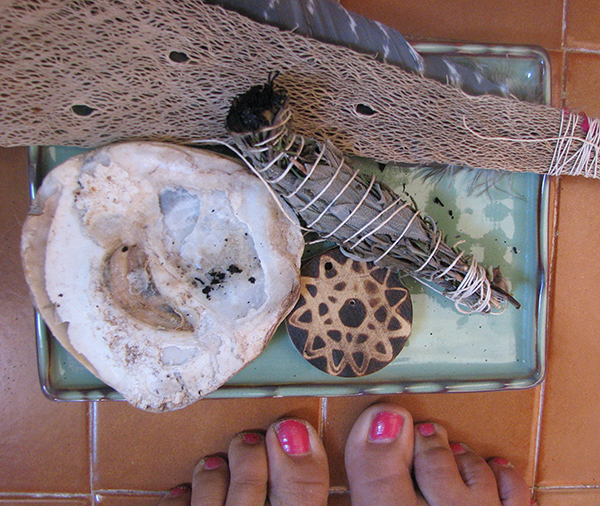
 When your stick is dry, you can burn it by lighting one end (blowing out the flame itself) and using a feather or fan-shaped object to pull the smokey air over yourself and into various areas of the room. Hold over a dish or shell so you can capture any burnt ashes that come loose.
Safety tip: Some plants may not be suitable to use in a smudge stick. Please do not burn a plant unless you know it is safe to do so.
***
Would you like to clear space for new possibilities?
 Hi, I'm Louise and thank you so much for visiting me here. I am a mixed media artist, who is passionate about combining the healing energy of nature and color with the meditative process of mandala making
Busy smudging my apartment and studio today ready for tonight’s new moon. I wrote this blog post a few years ago so thought I would share incase you feel called to make one and do the same 🙂 xx
I’ve gotten as far as making my own smudge stick but never actually burning it. I made it about a year and a half ago…is there such a thing as too dry?? I have sage, rosemary and lavender growing in abundance in my yard. Thanks for the prompting to make good use of them!
Hmmm not sure if there is such a thing as too dry. Give it a try. 🙂 I love sage, lavender and rosemary so I think i am going to make some more. xx
I felt I needed this recently… I had a heaviness about me for several days that I could not shift. It’s gone now thankfully but I will go and make some of these and have some ready for use.
I am also decluttering at home and having a good clear out so a smudge stick might help the process and create new energy. Thank you for the reminder 🙂